Contact Strada Administrator RequiredTo set up SSO with Okta, please contact your Strada administrator. Our team will provide you with the necessary SAML configuration URLs. After you complete the Okta configuration steps below, you’ll need to send us your Okta metadata URL in the format specified in this guide.
Overview
Strada supports Single Sign-On (SSO) through Okta, allowing your organization to manage user access centrally through your existing Okta identity provider. This enables secure and streamlined authentication for your team members.Prerequisites
Before configuring SSO, ensure you have:- Admin access to your Okta organization
- Contact with your Strada administrator
- The SAML configuration URLs provided by Strada
Step 1: Receive Configuration from Strada
Contact your Strada administrator to receive:- Single sign-on URL (ACS URL)
- Audience URI (SP Entity ID)
Step 2: Configure Strada Application in Okta
Create SAML 2.0 Application
- Log in to your Okta Admin Console
- Navigate to Applications > Applications
- Click Create App Integration
- Select SAML 2.0 as the sign-in method
- Click Next
General Settings
- App name: Enter “Strada”
- App logo: Download Strada logo and upload it to the application
- Click Next
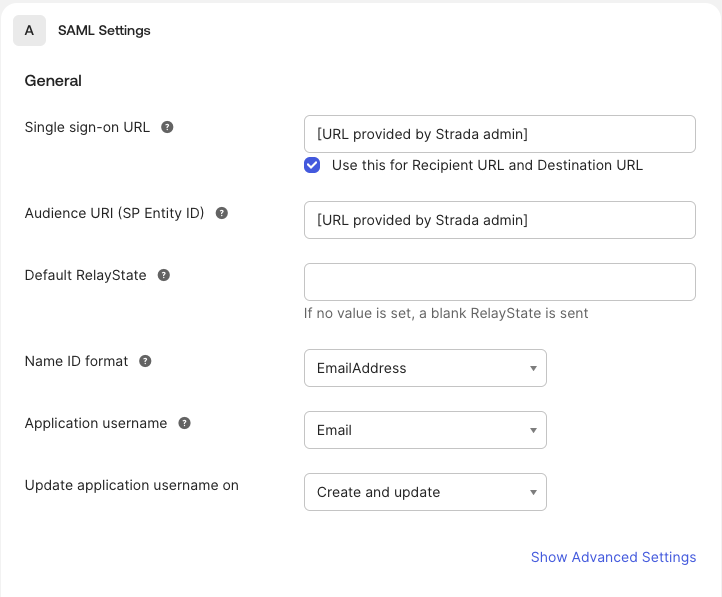
SAML Settings
Configure the following SAML settings using the URLs provided by Strada: Single sign-on URL:EmailAddress
Application username: Select Email
| Name | Name Format | Value |
|---|---|---|
| Basic | user.email | |
| firstName | Basic | user.firstName |
| lastName | Basic | user.lastName |

Feedback Section
On the next screen (Section 3), Okta will ask for feedback about your app integration. You can select any option here (e.g., “I’m an Okta customer adding an internal app”) and proceed - this section is optional and won’t affect your SSO configuration. Click Finish to complete the application setup.Step 3: Assign Users in Okta
Add Users to Application
- In your Strada application, navigate to the Assignments tab
- Click Assign > Assign to People or Assign to Groups
- Select the users or groups who should have access to Strada
- Click Assign and then Done
Step 4: Provide Metadata to Strada
Obtain Okta Metadata URL
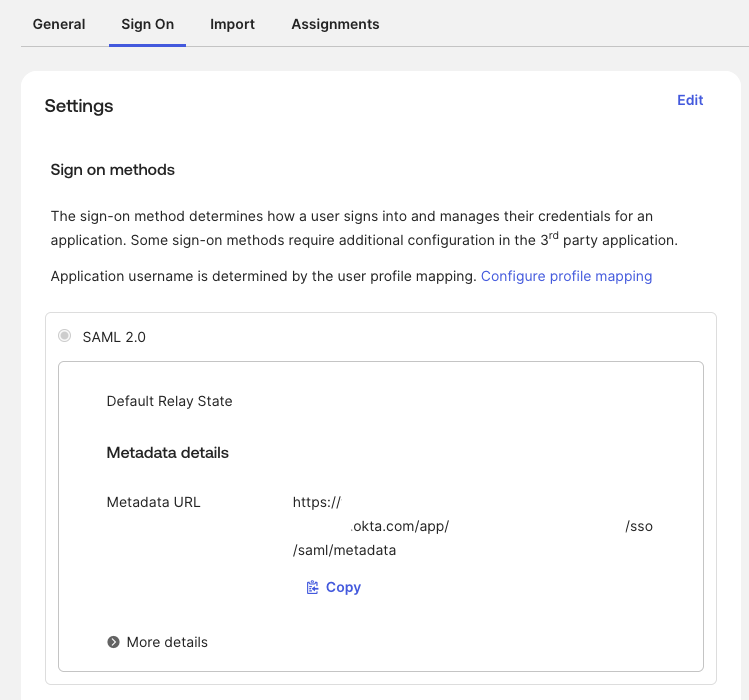
After completing your Strada application setup:- In your Strada application, navigate to the Sign On tab
- Scroll to the SAML 2.0 section
- Locate the Metadata URL (it should look like:
https://your-domain.okta.com/app/exkxxxx/sso/saml/metadata) - Copy this URL
Send to Strada
Share the metadata URL with your Strada administrator along with your organization name. Strada will complete the SSO configuration on their end and notify you when it’s ready for testing.Step 5: Test SSO Connection
Once Strada confirms the configuration is complete:- Navigate to your Strada login page
- Click Sign in with SSO
- You should be redirected to Okta for authentication
- After successful authentication, you’ll be redirected back to Strada