> ## Documentation Index
> Fetch the complete documentation index at: https://docs.getstrada.com/llms.txt
> Use this file to discover all available pages before exploring further.
# SSO with Google Workspace
> Configure Single Sign-On using Google Workspace for seamless authentication
**Contact Strada Administrator Required**
To set up SSO with Google Workspace, please contact your Strada administrator. Our team will provide you with the necessary SAML configuration URLs. After you complete the Google Workspace configuration steps below, you'll need to send us your IdP information in the format specified in this guide.
## Overview
Strada supports Single Sign-On (SSO) through Google Workspace SAML, allowing your organization to manage user access centrally through your Google Workspace identity provider. This enables secure and streamlined authentication for your team members.
***
## Prerequisites
Before configuring SSO, ensure you have:
* Super Admin access to your Google Workspace account
* Contact with your Strada administrator
* The SAML configuration URLs provided by Strada
***
## Step 1: Receive Configuration from Strada
Contact your Strada administrator to receive:
1. **ACS URL** (Assertion Consumer Service URL)
2. **Audience URI** (Entity ID)
Keep these URLs handy for the next step.
***
## Step 2: Configure Strada Application in Google Workspace
### Create Custom SAML App
1. Log in to the **Google Workspace Admin Console**
2. Navigate to **Apps** > **Web and mobile apps**
3. Click **Add app** > **Add custom SAML app**
 ### App Details
1. **App name**: Enter "Strada"
2. **Description**: Optional
3. **App logo**: Download Strada logo and upload it (optional)
4. Click **Continue**
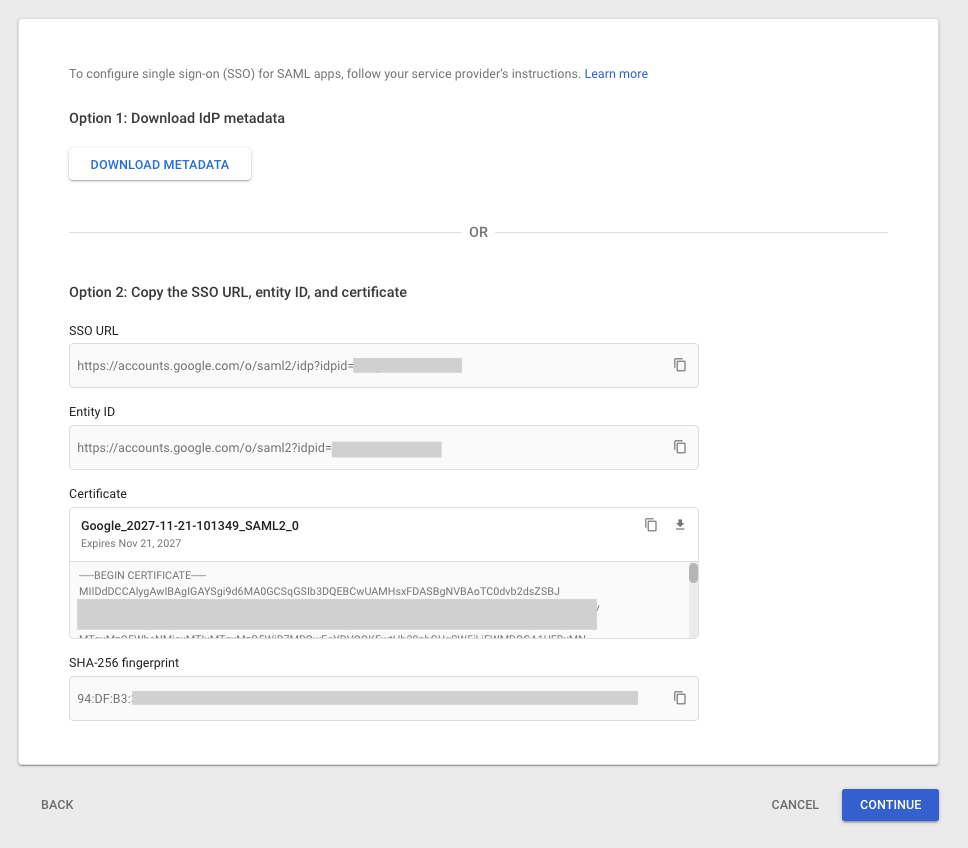
### Google Identity Provider Details
On this screen, you'll see Google's IdP information under **Option 2**. Copy the following three values (you'll need to share these with your Strada administrator in Step 3):
* **SSO URL**
* **Entity ID**
* **Certificate**
### App Details
1. **App name**: Enter "Strada"
2. **Description**: Optional
3. **App logo**: Download Strada logo and upload it (optional)
4. Click **Continue**
### Google Identity Provider Details
On this screen, you'll see Google's IdP information under **Option 2**. Copy the following three values (you'll need to share these with your Strada administrator in Step 3):
* **SSO URL**
* **Entity ID**
* **Certificate**
 Click **Continue** to proceed to the next step.
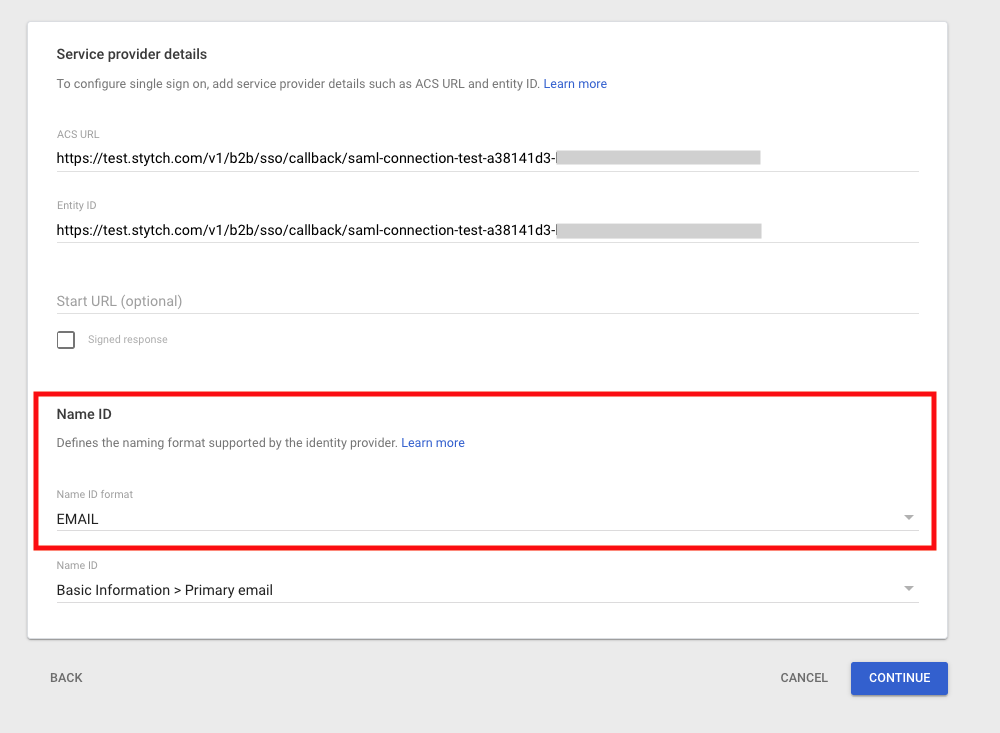
### Service Provider Details
In the **Service provider details** form, enter the following information from your Strada administrator and then click **Continue**:
**ACS URL:**
```
[URL provided by Strada administrator]
```
**Entity ID:**
```
[URL provided by Strada administrator]
```
**Name ID format:** `EMAIL`
**Name ID:** `Basic Information > Primary email`
Click **Continue** to proceed to the next step.
### Service Provider Details
In the **Service provider details** form, enter the following information from your Strada administrator and then click **Continue**:
**ACS URL:**
```
[URL provided by Strada administrator]
```
**Entity ID:**
```
[URL provided by Strada administrator]
```
**Name ID format:** `EMAIL`
**Name ID:** `Basic Information > Primary email`
 ### Attribute Mapping
On the next screen, add the following two attributes:
| Google Directory Attributes | App Attributes |
| --------------------------- | -------------- |
| First name | firstName |
| Last name | lastName |
Click **Finish** to complete the application setup.
***
## Step 3: Provide IdP Information to Strada
### Send to Strada
Share the three values you copied in Step 2 with your Strada administrator:
* **SSO URL** (from Google's IdP details)
* **Entity ID** (from Google's IdP details)
* **Certificate** (from Google's IdP details - copy the entire certificate)
* **Organization name**: Your organization name
Strada will complete the SSO configuration on their end and notify you when it's ready for testing.
***
## Step 4: Enable User Access
### Grant Access to Users
1. In your Strada application, navigate to the **User access** page
2. Choose one of the following options:
* **ON for everyone**: Grants access to all users in your organization
* **ON for some organizational units**: Select specific organizational units or groups
3. Click **Save**
***
## Step 5: Test SSO Connection
Once Strada confirms the configuration is complete:
1. Navigate to your Strada login page
2. Click **Sign in with SSO**
3. You should be redirected to Google for authentication
4. After successful authentication, you'll be redirected back to Strada
If you encounter any issues during login, contact your Strada administrator.
### Attribute Mapping
On the next screen, add the following two attributes:
| Google Directory Attributes | App Attributes |
| --------------------------- | -------------- |
| First name | firstName |
| Last name | lastName |
Click **Finish** to complete the application setup.
***
## Step 3: Provide IdP Information to Strada
### Send to Strada
Share the three values you copied in Step 2 with your Strada administrator:
* **SSO URL** (from Google's IdP details)
* **Entity ID** (from Google's IdP details)
* **Certificate** (from Google's IdP details - copy the entire certificate)
* **Organization name**: Your organization name
Strada will complete the SSO configuration on their end and notify you when it's ready for testing.
***
## Step 4: Enable User Access
### Grant Access to Users
1. In your Strada application, navigate to the **User access** page
2. Choose one of the following options:
* **ON for everyone**: Grants access to all users in your organization
* **ON for some organizational units**: Select specific organizational units or groups
3. Click **Save**
***
## Step 5: Test SSO Connection
Once Strada confirms the configuration is complete:
1. Navigate to your Strada login page
2. Click **Sign in with SSO**
3. You should be redirected to Google for authentication
4. After successful authentication, you'll be redirected back to Strada
If you encounter any issues during login, contact your Strada administrator.